Sun-dried Tomato Tuscan Sauce

Yesterday we got a teaser of spring and it was wonderful. Warm, sunny and energizing. I was very happy to see the sun battling the ice. The ice and I have been on particularly bad terms this year as I slipped at the beginning of January and broke my finger. I did finally order Yak Traks, though they don’t work on very slick ice. There have been a few near splits as well so bring on spring. Sadly, I know there will be a few more snow storms but I’ll just pretend while it lasts.

As we’re still in winter, comforting food is still important. I had seen several versions of a Tuscan Parmesan sauce and thought I would do my own version and make a Sun-dried Tomato Tuscan Sauce. I had my dish with pan seared salmon and did up pan seared chicken for my husband and son. I love salmon, I could eat it every day.

While this would be perfectly delicious with pasta but I wanted to keep it lighter so I did roast potatoes and a bed of fresh baby spinach.

Technique for Sun-dried Tomato Tuscan Sauce

Because this is a relatively quick sauce, particularly if you use sun-dried tomatoes in olive oil, start cooking the chicken first. I pan seared the chicken in a large skillet before finishing it off in the oven while I made the sauce.

In the skillet that was used for the chicken add a bit more olive oil. Add the sun-dried tomatoes and cook on medium low for a few minutes. Since we moved, we no longer have our gas stove and boy do I miss that control gas gives you over electric. You have to anticipate the heat level. Once the sun-dried tomatoes have cooked for a couple of minutes, add the scallions and garlic. Cook for a further couple of minutes.

Add the white wine and let reduce for a minute. At this point start pan searing the salmon. Season with sea salt and pepper.

Add the cream to the skillet with the sun-dried tomatoes. Bring to a simmer but don’t boil.

Once the sauce starts to thicken a bit add the parsley and parmesan cheese.

When the chicken and salmon are almost finished toss in the spinach and allow it to wilt a bit.

To plate, place a handful of fresh baby spinach on the plate. Lay the salmon on the spinach and spoon the sauce over the salmon. Grate fresh parmesan over the dish and serve immediately.

Sun-dried Tomato Tuscan Sauce

Flavours of Italy can be found in this easy and delicious sauce

Course Main Course
Cuisine Italian
Keyword Sun-dried Tomato Tuscan Sauce
Prep Time 10 minutes
Cook Time 20 minutes
Servings 4
Author Our Growing Paynes

Ingredients

  • 1 Salmon fillet per person
  • 2-3 tbsp olive oil
  • 5-7 sun-dried tomatoes sliced
  • 1 scallion/spring onion sliced
  • 1-2 cloves of garlic, coarsely chopped
  • 1/2 cup white wine 4oz
  • 3/4 cup heavy cream 6oz
  • 2 tbsp chopped fresh parsley
  • 1/2 cup freshly grated parmesan
  • 1 cup fresh baby spinach
  • 1 handful of fresh baby spinach per plate
  • sea salt and pepper to taste

Instructions

  1. In a large skillet, heat up the olive oil. Add the sun-dried tomatoes and saute for a few minutes.

  2. Add the garlic and scallions. After cooking for a couple of minutes add the white wine. Simmer to reduce down about a third. Lower the heat and add the cream. Don't boil, just simmer.

  3. Start pan searing the salmon in a skillet with some olive oil so it will be done about the time the sauce is finished.

  4. As the sauce starts to thicken, add the parmesan cheese and parsley. Season the sauce with sea salt and pepper.

  5. Once the salmon nearly finished, add the cup of spinach to the sauce to wilt.

  6. To plate, add a handful of fresh baby spinach. Place the salmon on the spinach and spoon the sauce over the salmon. Grate fresh parmesan over the dish and serve immediately.

Scallops with Sun-dried Tomatoes

We’re in the thick of summer with high heat and soup like humidity, my least favourite weather. I feel like we hibernate more in the summer than we do in the winter but the heat just saps all energy out of the body. This calls for quick and light meals such as Scallops with Sun-dried Tomatoes.

We should be getting a break in the weather this weekend. I really hope for once the weather people are correct. So often we are disappointed given how erroneous the forecast often is. Very rarely we are pleasantly surprised!

Technique for Scallops with Sun-dried Tomatoes

This recipe is low FODMAP as I use garlic scapes instead of garlic. Obviously if you don’t have to worry about garlic, use that instead as it gives more of that lovely garlic flavour.

Garlic scapes are in season at the moment and they do lend a fresh flavour to this dish.

Heat the oil to medium in a skillet. Start slowing sautéing the tomatoes to release their flavour and to soften them a bit. Keep frequently to keep it from catching. I made the error of getting distracted with something else and burnt the first batch of tomatoes.

Add the scapes and sauté for a couple of minutes before adding the lemon juice and season with sea salt and freshly ground pepper.

Meanwhile prep the scallops by dabbing them with paper towels/kitchen roll to dry them a bit. Season with sea salt and freshly ground pepper. Place into a skillet with the hot oil. Allow to cook for a few minutes until they freely come away from the skillet.

Turn over and cook the other side.

I roasted potatoes in duck fat, such a guilty pleasure! Place the scallops over a bed of greens and top with the sun-dried tomato mixture. As my husband and son don’t like seafood I marinated steak with balsamic vinegar, grilled it and served it with the sun-dried tomatoes.

Scallops with Sun-dried Tomatoes

A flavourful Italian summer meal with garlic scapes and sun-dried tomatoes

Course Main Course
Cuisine Italian
Keyword Scallops with Sun-dried Tomatoes
Prep Time 5 minutes
Cook Time 10 minutes
Servings 2

Ingredients

  • 8 Sea Scallops
  • 2 tbsp olive oil for scallops
  • 2 tbsp olive oil for sun-dried tomatoes
  • 1/2 cup sliced sun-dried tomatoes 1oz
  • 1/3 cup chopped garlic scapes 2oz
  • 1 tbsp lemon juice
  • sea salt and freshly ground pepper to taste

Instructions

Scallops

  1. Dab scallops with paper towel/kitchen roll to remove excess moisture. Season with sea salt and freshly ground pepper.

  2. Heat up the olive oil in a skillet. Place the scallops into the skillet. Cook on one side until the scallops freely move from the skillet. Turn and cook the other side.

Sun-dried Tomato mixture

  1. Heat the olive oil in a skillet to medium heat. Start cooking the sun-dried tomatoes. Stir frequently to keep the tomatoes from catching.

  2. After a few minutes add the garlic scapes. Sauté for a couple of minutes then add the lemon juice. Season with sea salt and freshly ground pepper to taste.

Putting it all together

  1. On a bed of greens, place the scallops. Top with the sun-dried tomato mixture and serve.

Minestrone Soup

We seem to be in a continuous cycle of warm temperature to bitter cold temperature and back again. Germs everywhere! Minestrone soup is a great antidote to fighting off all the stuff going round. As remedies go, it’s a delicious comfort food.

My husband had sent me an article from the Guardian about Ultra Processed Food. For those that follow this blog, you know we’re big on cooking from scratch and keeping overly processed food out of our diet. I found it interesting when the article mentioned that it’s a good sign to see a container of sugar in the kitchen. The reason is, it’s a sign that home cooking from fresh ingredients occurs. Which is so much better than buying boxed goods.

Technique for Minestrone Soup

While this is a very easy soup to make on a busy night, I do recommend to make it a day or so ahead for the flavours to really come out.

Heat up the olive oil in a large saucepan. Sautè the onions until they soften. Add the garlic, carrots and celery. Cook for a few minutes.

Add the mushrooms and peas. The beauty of this soup is you can add whatever veg you want. I don’t like zucchini/courgettes and the like, especially in soup, so I left those out even though they are more traditional.

For the diced tomatoes I like to use fire roasted for a deeper flavour. Continue to cook for a few minutes before adding the veg bouillon. Bring to a simmer.

Season with the herbs, sea salt and pepper. Add the pasta and bring to a boil until the pasta starts to soften. Turn back down to a simmer.

Years ago, on our honeymoon in Italy, we had taken a cooking lesson and the woman gave us a tip on how to use up the parmesan ends. Throw in the piece into the soup and simmer. It gives a really lovely cheesy balance to the soup.

Serve with fresh bread and butter. Perfect for the whacky winter evenings.

Minestrone Soup

A hearty delicous soup

Course Soup
Cuisine Italian
Keyword Minestrone Soup
Prep Time 10 minutes
Cook Time 30 minutes
Author Our Growing Paynes

Ingredients

  • 2 tbsp olive oil
  • 1 small onion, coarsely chopped
  • 2-3 cloves of garlic, coarsely chopped
  • 1-2 stalks of celery, chopped
  • 1 small carrot, chopped
  • 1-2 mushrooms, coarsely chopped
  • 1 cup frozen peas
  • 2 14oz cans diced tomatoes
  • 3 cups vegetable bouillon
  • 1 tbsp fresh thyme
  • 1 tbsp fresh oregano, chopped
  • sea salt and pepper to taste
  • parmesan cheese end
  • 1 cup rotini pasta, dry

Instructions

  1. Heat up the olive oil in a large saucepan. Sautè the onions until they begin to soften. Add the garlic, celery and carrots to the pan. Cook for a few minutes before adding the mushrooms and peas. After cooking for a few more minutes add the diced tomatoes.

  2. Add the bouillon and the pasta. Bring to a boil and reduce to a simmer. Add the herbs and season with the sea salt and pepper. Toss in the cheese end. Once the pasta is cooked, it is ready to serve.

Lemon Rosemary Grilled Pork

While I don’t like the heat and humidity we get this time of year, I do love that we are starting to be able to benefit from our veg garden. Miraculously, thanks to my lovely husband, we still have a rosemary plant going strong. It’s an annual where we live and he’s managed to get it to grow to a decent size. I would have killed it by now.

To keep it a manageable size, I’ve been using it a lot in various dishes, including my Lemon Rosemary Pork. For a side dish I sautéed some swiss chard we’re growing. The swiss chard is going gang busters this year, it’s rivaling the rhubarb!

Technique for Lemon Rosemary Pork

I love the pink of the Himalayan salt

Get the dry ingredients of the marinade together before adding the olive oil and lemon juice.

Add the pork and marinate for at least a couple of hours in the fridge. When it’s time, start prepping the sauce ingredients while the grill warms up. Heat up the butter in a skillet and add the mushrooms.

Cook for a couple of minutes before adding more garlic and rosemary. Once you add the pork to the grill, add the remaining marinade to the skillet. Bring up to a simmer.

Add the chicken stock and lemon juice. Simmer for a few minutes. Remove about a 1/4 cup of the sauce and set aside.

Once the pork is cooked and resting, sautè the swiss chard in the remaining sauce. Cook the stalk pieces first then add the leafy bits. I like them slightly wilted but not mushy.

Spoon the chard onto the plate, top with the pork and drizzle the reserve sauce over the dish.

I need to come up with more swiss chard dishes as well because they aren’t showing any sign of letting up.

Lemon Rosemary Pork

A flavourful dish for grilling season

Course Main Course
Cuisine Italian
Keyword Lemon Rosemary Pork
Prep Time 15 minutes
Cook Time 20 minutes
Servings 2

Ingredients

Marinade

  • 2 tbsp fresh rosemary, finely chopped
  • 2 cloves of garlic, finely chopped
  • 1/2 tsp fresh ground pepper
  • 1 tsp sea salt
  • 3 tbsp olive oil
  • 2 tbsp lemon juice
  • 2 pork chops

Sauce

  • 3 tbsp butter
  • 1/2 cup chopped mushrooms
  • 1 tbsp fresh rosemary, finely chopped
  • 2 cloves of garlic, finely chopped
  • remaining marinade
  • 1/2 cup chicken stock
  • 2 tbsp lemon juice
  • sea salt and fresh ground pepper to taste
  • 2 cups swiss chard

Instructions

Marinade

  1. Mix all the ingredients for the marinade. Add the pork and chill for at least a couple of hours.

Grilling the Pork

  1. Heat the grill to medium high. Grill the pork until the internal temperature is 145F/63C. Allow to rest about 10 minutes.

Sauce

  1. Heat up the butter in a skillet. Sautè the mushrooms for a few minutes. Add the rosemary and garlic. After cooking for a few minutes, add the chicken stock and lemon juice. Bring to a simmer.

  2. Reserve a 1/4 cup of the sauce for the pork.

  3. In the remaining sauce, cook the swiss chard stalk pieces for a minute or two, then add the leafy part of the chard to slightly wilt.

Assembling the Dish

  1. Spoon the swiss chard onto the centre of the dish. Place the pork onto the swiss chard and spoon the reserve sauce over the pork.

Italian Meatball Skewers

Winter has rolled in uninvited.  Unfortunately it hit on my husband’s birthday so he wasn’t overly impressed to be snow blowing that day.  Something tells me it’s going to be a rough winter but hopefully I’m proved wrong.  Normally I hate being wrong but I’d love to be in this case.  Fortunately the storm was through and done before we had our annual potluck game night to celebrate his birthday.  Though I have to say, we have hearty friends, they would have come anyway. You can’t stop fun! Because it was game night, finger food was a must so I made Italian Meatball Skewers.  Tasty and easy to eat.

This is also super easy to make!

Technique for Italian Meatball Skewers:

Preheat the oven to 400F/200C.

The key for this dish is to use fresh ingredients.

In a mixing bowl add all the ingredients and combine them with your hands.  It’s always a weird feeling but it’s the best way to get everything incorporated without overworking the meat.

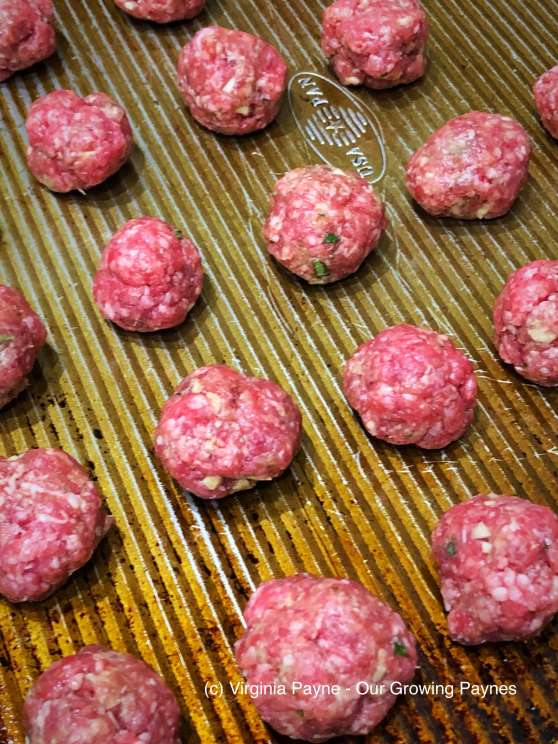
Roll the mixture into 1in/2.5cm balls.  Place on a baking sheet and bake 10-15 minutes.  For the last few minutes put the oven on convection/fan to brown the outside.

Slice the grape tomatoes in half and layer the meatballs, tomatoes, cheese and basil onto the toothpicks.

Serve immediately.  And let the games begin!


Italian Meatball Skewers

A flavourful party food.

Course Side Dish
Cuisine Italian
Keyword Italian Meatball Skewers
Prep Time 10 minutes
Cook Time 15 minutes
Total Time 25 minutes
Servings 8 people
Author Our Growing Paynes

Ingredients

Meatballs

  • 1 pound ground beef
  • 1 egg, beaten
  • 2-3 cloves garlic, finely chopped
  • 2 small handful fresh oregano, finely chopped
  • 1/2 cup freshly grated parmesan
  • 1 tsp coarse sea salt
  • 1/2 tsp freshly ground pepper

Remaining ingredients

  • grape tomatoes, sliced in half
  • small mozzarella balls
  • fresh basil, torn into pieces

Instructions

  1. Preheat the oven to 400F/200C.

  2. Mix all the ingredients in a bowl with your hands.  Roll the mixture into balls 1in/2.5cm in diameter.  Place on a baking sheet and bake for 10-15 minutes.  In the last few minutes change the oven over to convection/fan to crisp up.

  3. Layer the meatballs, tomatoes, mozzarella and basil onto toothpicks.  Serve immediately.  

Basil Wine Sauce Over Grilled Salmon

It’s been a very interesting week getting the new business off the ground.  Aside from opening up the Etsy shop I also did a local art show called Art in the Park.  It was a great experience as I was able to get advice from fellow artists and everyone was so positive.  In addition to getting a few sales I also got great positive feedback which lets me know I’m not tilting at windmills.

I also upgraded this site to the business level and spent quality time with the “happiness engineers” to get a shop set up on my blog.  It took several hours as I seem to have a knack to ask for stuff that require special coding.  I still have a few more things to do but it’s all a go now!

Earlier this summer, when we were in Swanage, we took my in-laws out to dinner to thank them for putting us up and putting up with us.  We tried an Italian restaurant in town which wasn’t too bad.  The highlight of the meal was for my daughter and I as we ordered poached salmon with an amazing basil sauce.  She and I raved about it.  Once all the summer adventures were over I knew I needed to make this again as a treat.

I will admit, using fresh basil in it’s prime is best.  Our basil in the garden is a bit past it’s prime but the flavour was still there.

Making the Basil Wine Sauce

Prep the salmon first.  Season with sea salt and pepper.  Slice a lemon to grill the salmon on.

Basil Sauce 2 2018

Grilling over lemons gives it a great flavour.

Pick a bunch, about three handfuls.  Wash and blend with a third a cup of dry white wine.

Basil Sauce 1 2018

In a saucepan melt 3-4 tablespoons of butter.  Add 2 cloves of garlic, finely chopped, along with the basil and wine.  Sauté on low to medium heat.  The goal is to have a hint of the white wine come through with the basil being the highlight.  If need be, add more butter to get the right balance.  Sometimes the wine can be a bit harsh.

Basil Sauce 3 2018

While this is cooking, grill up the salmon.  I also grilled chicken for my husband and son. Do up a fresh salad and top with the salmon and the basil wine sauce.

Basil Sauce 4 2018

I was hoping this meal was the swan song of the summer but the summer just won’t quit!  My daughter enjoyed this and was happy I can recreate the dish for us.  I think the best trips down memory lane are food related.


Grilled Salmon with Basil Wine Sauce

A delicious sauce of basil and wine drizzled over grilled salmon.

Course Main Course
Cuisine Italian
Prep Time 10 minutes
Cook Time 10 minutes
Total Time 20 minutes
Servings 2 people
Author Our Growing Paynes

Ingredients

Salmon

  • 1/2 lb wild sockeye salmon
  • 1 lemon
  • pinch sea salt
  • pinch freshly ground pepper

Sauce

  • 1 1/2 cup fresh basil
  • 1/3 cup dry white wine
  • 3-4 tbsp butter
  • 2 cloves garlic, finely chopped

Instructions

  1. Season the salmon with the sea salt and pepper.  Slice the lemon about 1/4"/.6cm thick.  Heat up the grill and grill the salmon on the lemon slices.

  2. Blend the basil and wine together.  Melt the butter in a skillet.  Add the basil and garlic and sautè.  Add more butter if needed to keep a balance of flavour with the wine.  

  3. Make a salad, top with the salmon and basil wine sauce.  

Italian Potato Salad

Before I get to the Italian Potato Salad I have to say I am very excited that I’ve opened up my Etsy shop!  I’ve been working for months on researching what to do and getting my photos together.  I’m starting off with greeting cards but I’ll be adding enlargements and such as I go along.  It is call CreationsByOGP, for some reason Etsy doesn’t like spaces!

If you have a chance, please check it out at CreationsByOGP.

As we’re still battling a fierce heatwave with crazy humidity, dinners need to be easy to put together because standing over a hot stove isn’t my idea of fun in the summer.  The farmer’s market had new potatoes so I decided to make an Italian Potato salad.

Technique for Italian Potato Salad:

I prepped the dressing first so it was ready.

Italian Potato Salad 1 2018

Mix 2 parts olive oil with one part lemon juice.  Add a healthy handful of fresh thyme and season with sea salt and pepper.  Whisk the ingredients well and set aside.  Next wash the potatoes and roast them at 425F/220C until they are cooked through and the skins are a bit crispy.  Take 4-6 rashers of streaky bacon and cook in a skillet until they are done to the way you like them.  We like them slightly crispy but not cooked too hard.

Italian Potato Salad 2 2018

Dice the bacon and set aside.  Once the potatoes are cooked, slice the larger ones in half as you want them bite size.

Italian Potato Salad 3 2018

Toss in a large bowl with the dressing and bacon.  Add fresh basil, tomatoes and mozzarella cheese.  Grate fresh parmesan to finish.

Italian Potato Salad 4 2018

For a bit of variation you can also add grilled chicken or grilled fish.  I have to say though, I’m ready for cooler weather so I can do some baking and such.  Hopefully it’s right round the corner.

Italian Potato Salad

A delicious twist on potato salad with fresh basil and tomatoes.

Course Main Course
Cuisine Italian
Keyword Italian Potato Salad
Prep Time 15 minutes
Cook Time 30 minutes
Total Time 45 minutes
Servings 6 people
Author Our Growing Paynes

Ingredients

Dressing

  • 3 tbsp extra virgin olive oil
  • 1 1/2 tbsp lemon juice
  • 1 tbsp fresh thyme
  • pinch sea salt
  • 1/2 tsp fresh ground black pepper

Salad

  • 1 lb new potatoes 400g
  • 4-6 rashers streaky bacon
  • 1/2 cup fresh basil, torn to small pieces
  • 1-2 fresh tomatoes, diced
  • 1 cup small mozzarella balls
  • 1/4 cup freshly grated parmesan cheese

Instructions

  1. Whisk the olive oil and lemon juice together.  Add the thyme, sea salt and pepper.  Mix well.  Set aside.

  2. Preheat the oven to 425F/220C.  Roast the potatoes until the skins are crispy.  Cook the bacon until they are slightly crispy.  Cut up the bacon and slice any new potatoes that are more than bite sized.  Toss all the ingredients together and serve.  

Getting My Husband to Like Aubergine 

We all have a veg we’re not a fan of but the rest of the family likes.  I hate Brussel sprouts, our son isn’t a fan of asparagus and mushroom, and our daughter finds celery particularly weird.  Aubergine is what my husband would be happy to avoid.  I have made the Moroccan Lamb Stew that he likes but as we like to grow the veg I need to come up with more recipes to use up the harvest.


When we were in Little Italy our daughter ordered a starter that layered aubergine, tomato, prosciutto, and basil.  She loved it so this was the inspiration for dinner.  I wanted to use the strong flavours of sun dried tomatoes and garlic for this dish.  I wanted it to pop!  I also used chicken thighs as it is a less expensive cut of meat to use.  

For this dish I used a little more than half a pound/10 oz of chicken.  Cut the chicken into small cubes and finely chop 3-5 cloves of garlic. Slice a large handful of sun dried tomatoes while heating up a couple of tablespoons of olive oil in a skillet.  Toss in the three ingredients and sauté on medium low to pull the flavours of the garlic and sun dried tomatoes into the oil.  


Once the chicken is halfway cooked add the aubergine.  We grew small Italian finger aubergine which get to about 5in/12.5cm long.  For this dish I used four of the veg, sliced.


Cook for a few minutes then add a couple of tablespoons of balsamic vinegar.  Because we ran out of our chicken stock (gasp!) I used veg bouillon instead.  It worked really well with the strong flavours.  Use about a cup/8oz of the bouillon and simmer to reduce slightly.  For once we did really well growing basil this year.  Let’s face it, gardening can be a bit of a crapshoot.  But I tossed in a handful of the fresh basil.  Once the dish is nearly finished cooking add a handful of chopped prosciutto.  You don’t want this ingredient cooking too long as it can get tough and overpowering.


While all this was going on I oven roasted potatoes that I sliced about a 1/4 in/.625cm thick, drizzled with olive oil and sea salt.  Lay out the potatoes and top with the aubergine dish.  Grate fontina cheese over the dish and garnish with fresh basil.


Our daughter said it wasn’t exactly like the dish she had, which was fine as I wasn’t reproducing it, but that she loved it.  My husband’s response? “Congratulations on making aubergine edible!”  😄.  I do love cooking for my family.

Slow Cooked Pork Pasta

The kids are very happy today.  There is nearly 6 inches of snow on the ground so they got a snow day.  Granted back in my day we wouldn’t have had the day off!  I literally walked up hill both ways.  Not sure if we’re getting soft or just more safety conscious.

I did take a short video of our lovely snow storm but it turns out in the past few months WordPress decided to not let the lowly plebs upload videos anymore.  But you can see it on Instagram if you wish.  I guess this means I really need to get off my duff and upgrade the site!

We’re making progress on the room we are reworking.  Got the primer on the walls and picked up the flooring this weekend.  So I needed an easy dinner to put together with the kids coming back for the week.

slow-cooked-pork-pasta-1-2016

Doing a slow cooked pork dish fit the bill.  Because of what we had going on I had time to toss everything into the baking dish and that’s about it.  If you have more time, brown the pork before you put it in the dish.  However, if you don’t have time it will still be delicious.

slow-cooked-pork-pasta-2-2016

Add a half a large red onion, finely chopped, with a few cloves of garlic, coarsely chopped to the baking dish.  Then add a 14oz can of diced tomatoes and 1/2 cup of red wine.  Season with sea salt, pepper, some red pepper flakes, and a couple of teaspoons of oregano.  Bake at 300F/150C for several hours until the pork is tender and falling apart.  Taste halfway through to adjust the seasoning.

slow-cooked-pork-pasta-3-2016

Toss in the pasta and serve.  Grate with a hard Italian cheese and enjoy.  This is a very easy flavourful dish to make when life is crazy busy.  And of course a nice glass of red wine goes nicely with this.  🙂


Italian Salad and Being Exercised by the House

Negative space.  Great when it comes to artwork.  Not so much when it comes to a house.  Our house was built in 1895 and I have to say it was solidly built.  It’s still relatively square. But man, when we redo rooms or do projects we find some serious negative space.  While our kids are off on their summer adventures we redid my son’s floor.  Because the wood had been damaged we had to pull up the old flooring.  Which gave us a chance to put in new insulation.  And that is where we saw the latest example of negative space.  So we stuffed a lot of insulation in.  Our son will be quite toasty this winter.

Thankfully that is a few months off.  On Father’s Day we joined our friends in the traditional Father’s Day BBQ and I had made a twist on the caprese salad with bacon and lettuce.  I didn’t have the time to get stuff together for a blog post then but I thought I’d remake it for my husband and I but added chicken.  Because why not?

Italian salad 1 2016

In a skillet start cooking 4-5 rashers of streaky bacon, chopped up.  Once the bacon is half cooked add about a third of a cup of chopped onion and a couple of cloves of garlic, chopped.  Add a teaspoon or so of fresh thyme.

Italian salad 2 2016

While this is cooking make up the dressing and grill the chicken.  I just seasoned the chicken with sea salt and pepper as it will be dressed before adding to the salad.  In a bowl add olive oil and white balsamic vinegar.  The ration was about 1:3/4 oil to vinegar.  Whisk to emulsify. Season with sea salt and pepper.

Italian salad 3 2016

Cut up the chicken into small pieces.  Add the chicken and the bacon mixture to the bowl and toss in the dressing.

Italian salad 4 2016

Add to lettuce and top with chopped tomatoes, mozzarella, and basil.

Italian salad 5 2016

A super easy, flavourful salad for summer nights.  Without leaving you feeling stuffed.